


Description
A micro SD storage board and TF card reader memory module SPI port is a type of computer hardware that allows you to read and write data to microSD cards. SPI (Serial Peripheral Interface) is a standard protocol used to communicate with the micro SD card, which is a type of flash memory storage used in mobile devices, cameras, and other electronic devices. The module typically connects to a computer's USB port and supports various operating systems, such as Windows, macOS, and Linux. It can be useful for transferring files, backing up data, and editing photos and videos.
Hardware Overview
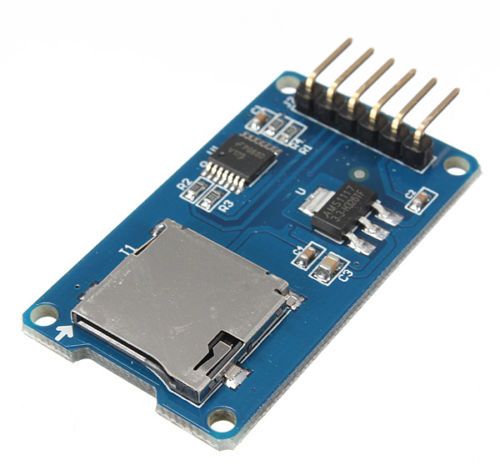
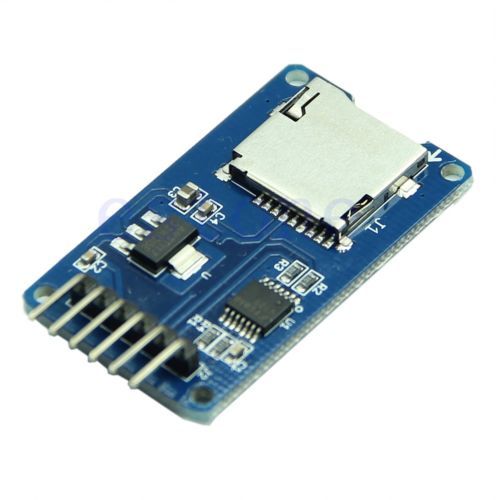
The microSD card module contains two main components:
A standard microSD card has an operating voltage of 3.3 V. As a result, we cannot connect it directly to circuits that use 5V logic; in fact, any voltages above 3.6V may permanently damage the microSD card. That is why the module includes an onboard ultra-low dropout voltage regulator capable of regulating voltage to 3.3V.

The module also includes a 74LVC125A logic level shifter chip, allowing for safe and easy communication with your favorite 3.3V or 5V microcontroller without damaging the SD card.

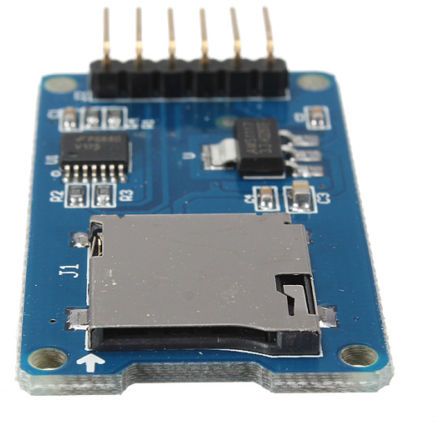
There’s a microSD card socket on the front! Any microSD memory card will work perfectly. The proper direction to insert a microSD card is usually printed on the module.

Pinout

VCC pin provides power to the module and should be connected to the Arduino’s 5V pin.
GND is a ground pin.
MISO (Master In Slave Out) is the SPI output from the microSD card module.
MOSI (Master Out Slave In) is the SPI input to the microSD card module.
SCK (Serial Clock) pin accepts clock pulses from the master (an Arduino in our case) to synchronize data transmission.
CS (Chip Select) pin is a control pin that is used to select one (or a set) of slave devices on the SPI bus.
Preparing the microSD card
Before inserting the microSD card into the module and connecting it to the Arduino, you must properly format the card to FAT16 or FAT32.
If you have a new SD card, chances are it’s already pre-formatted with a FAT file system; however, you may encounter issues with how the factory formats the card. Or, if you have an old card, it needs to be formatted. In any case, it’s a good idea to format the card before using it.
It is recommended that you use the official SD card formatter utility developed by the SD association. It can solve a lot of problems caused by bad formatting! Download and run the formatter on your computer; simply select the appropriate drive and click Format.

Wiring a microSD Card Module to an Arduino
Now that your card is ready for use, we can connect the microSD breakout board to an Arduino!
Connect the module’s VCC pin to 5V on the Arduino and the GND pin to ground.
Now we are left with the pins that are used for SPI communication. Because microSD cards require a lot of data transfer, they perform best when connected to the microcontroller’s hardware SPI pins.
Note that each Arduino board has different SPI pins that must be connected correctly. For Arduino boards such as the UNO/Nano V3.0 those pins are digital 13 (SCK), 12 (MISO), 11 (MOSI) and 10 (CS).
The following table lists the pin connections:
| microSD Card Module | Arduino | |
| VCC | 5V | |
| GND | GND | |
| MISO | 12 | |
| MOSI | 11 | |
| SCK | 13 | |
| CS | 10 |
The diagram below shows how to connect microSD Card Module to the Arduino.

Arduino Code – Testing the SD card module with CardInfo
Communicating with an SD card is a lot of work, but luckily for us, the Arduino IDE already includes a very useful library called SD that makes reading and writing SD cards easier.
Let’s start with a simple CardInfo example sketch. This sketch doesn’t write any data to the card. Instead, it tells you if the card is recognized and shows you some information about it. This can be very useful when determining whether or not an SD card is supported. It is therefore recommended that you run this sketch once before trying out a new card.
To open the CardInfo example sketch, navigate to File > Examples > SD > CardInfo.

Verify that the chipSelect line is correctly initialized at the beginning of the sketch. In our case, we are using digital pin #10, so change it to 10.

Now, insert the SD card into the module and upload the sketch. When you open the Serial Monitor, you may see different results depending on the scenario.
Scenario 1: Everything is fine
If everything is fine, you should see some useful information. For example, in our case, the card type is SDHC (SD High Capacity), the volume type is FAT32, and the size of the card is 4 GB.

Scenario 2: SD card is corrupt
If you have a bad card like this one, you may see this:

Although the card responded, all the data is inaccurate. As you can see, there is no Manufacturer ID or OEM ID, and the Product ID is ‘N/A.’ It appears the card returned SD errors.
If you get something like this, you can try reformatting it, but if the problem persists, you may have to throw the card away.
Scenario 3: Wiring error or card is permanently damaged
If there is a wiring error or the card is permanently damaged, you will see something similar to this. You can see that it couldn’t even initialize the SD card.

In this case, double-check the wiring and re-run the sketch.
Scenario 4: SD card is not formatted properly
If the wiring is correct but the SD card is not properly formatted, you will see something like this:

Try formatting the card and running the sketch again.
Arduino Code – Reading and Writing Data
Assuming you were successful with the previous sketch, we will proceed to the next experiment. The following sketch will demonstrate how to write to a file and then verify its contents by reading it back. Try out the sketch before we get into the details.
#include <SPI.h>
#include <SD.h>

File myFile;

// change this to match your SD shield or module;
const int chipSelect = 10;

void setup()
{
  // Open serial communications and wait for port to open:
  Serial.begin(9600);
  while (!Serial) {
    ; // wait for serial port to connect. Needed for Leonardo only
  }


  Serial.print("Initializing SD card...");

  if (!SD.begin()) {
    Serial.println("initialization failed!");
    return;
  }
  Serial.println("initialization done.");

  // open the file. note that only one file can be open at a time,
  // so you have to close this one before opening another.
  myFile = SD.open("test.txt", FILE_WRITE);

  // if the file opened okay, write to it:
  if (myFile) {
    Serial.print("Writing to test.txt...");
    myFile.println("testing 1, 2, 3.");
    // close the file:
    myFile.close();
    Serial.println("done.");
  } else {
    // if the file didn't open, print an error:
    Serial.println("error opening test.txt");
  }

  // re-open the file for reading:
  myFile = SD.open("test.txt");
  if (myFile) {
    Serial.println("test.txt:");

    // read from the file until there's nothing else in it:
    while (myFile.available()) {
      Serial.write(myFile.read());
    }
    // close the file:
    myFile.close();
  } else {
    // if the file didn't open, print an error:
    Serial.println("error opening test.txt");
  }
}

void loop()
{
  // nothing happens after setup
}
After the code is uploaded, the serial monitor will show the following:

If you reset your Arduino and let the sketch run again, the new data will be appended to the file without overwriting the old data.

Code Explanation:
The sketch begins by including the SD library and the SPI library, which allow us to communicate with the SD card via the SPI interface.
#include <SPI.h>
#include <SD.h>
Next, we declare the Arduino pin to which the SD card module’s CS (Chip Select) pin is connected. Except for the CS pin, we do not need to declare any other SPI pins because we are using a hardware SPI interface and these pins are already declared in the SPI library.
Then we create a file object called myFile, which has methods and attributes for accessing and manipulating files.
const int chipSelect = 10;
File myFile;
In the setup() section, we initialize the serial communication and call the SD.begin() function. If it manages to recognize the card, it prints “initialization done.” on the serial monitor. If it doesn’t, it prints “initialization failed!” and the program terminates.
Serial.begin(9600);
  Serial.print("Initializing SD card...");
  if (!SD.begin()) {
    Serial.println("initialization failed!");
    return;
  }
  Serial.println("initialization done.");
Next, we call the open() function. This function opens a file or creates a file if it does not exist. It requires two parameters: the name of the file to open and the mode in which the file should be opened.
File mode can be FILE_READ (opens the file for reading and places the cursor at the beginning of the file) or FILE_WRITE (opens the file for reading and writing and places the cursor at the end of the file).
In our case, we’re creating a file called “test.txt” and opening it in read-write mode.
myFile = SD.open("test.txt", FILE_WRITE);After we open the file, we use the println() function to write data to it. The println() function is similar to the one we use to print data on the serial monitor. The print() function is also available if you don’t want to move the cursor to a new line.
We then close the file by using the close() function. This function closes the file and makes sure that any data written to it is saved to the SD card.
if (myFile) {
    Serial.print("Writing to test.txt...");
    myFile.println("testing 1, 2, 3.");
    myFile.close();
    Serial.println("done.");
  } else {
    Serial.println("error opening test.txt");
  }
Let us now read back the contents of the same file to see if the previous write operation was successful. To accomplish this, we will first open the file using the same open() function, but this time in read mode. Because the file “test.txt” has already been created, it will simply open it.
Then, using the myFile.read() function, we will read from the file and print it to the serial monitor. Because the read() function only reads one character at a time, we have to use the while loop and the myFile.available() function to read all the characters in the file.
Finally, we close the file.
myFile = SD.open("test.txt");
  if (myFile) {
    Serial.println("test.txt:");
    while (myFile.available()) {
      Serial.write(myFile.read());
    }
    myFile.close();
  } else {
    Serial.println("error opening test.txt");
  }
Because this is just a demo sketch to show how to read and write files, there is no point in running the code multiple times. So, all of the code is placed in the setup() function, which runs once, rather than the loop() function, which runs repeatedly.
void loop()
{
}
Important things to note
- You can use the print() and println() functions to write strings, variables, and so on, just like Serial objects.
- read() function returns a single character at a time. It doesn’t read a complete line.
- When you’re done with the file, you must use the close() function to make sure that all the data is written permanently. This also reduces the amount of RAM being used.
- You can open files in a directory. To open a file in the directory, for example, use SD.open("/myfiles/example.txt"). Remember that the path to the file is relative.
- The SD card library does not support long filenames because it uses the 8.3 filename format. So keep file names short. For instance, “datalog.txt” is fine, but “My Sensor log file.text” is not!
- Keep in mind that file names are not case sensitive. So datalog.txt is the same as DataLog.Txt and DATALOG.TXT