


Description
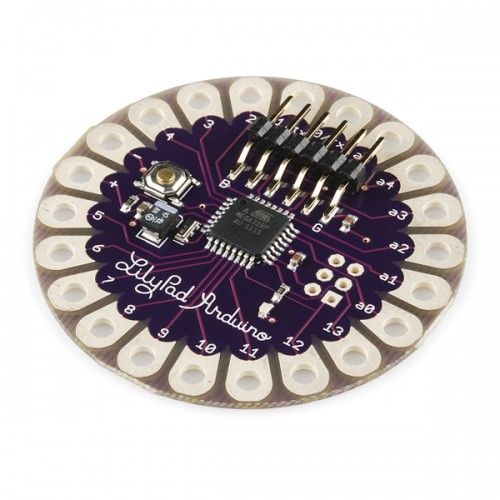
- Arduino LilyPad is an Arduino Main Board that is mainly designed for e-textiles and wearables projects and is based on the Atmega168/Atmega328 microcontroller.
- LilyPad is nothing but an Arduino-programmed microcontroller and works similar to other Arduino boards available.
- It comes in a round shape unlike other Arduino boards so that it could fit easily in wearables.
- However, the ability of this board to be sewn down with the fabric or sensor through conductive thread puts it ahead and stands out of the boards available in the Arduino community.
- There are 22 wide open pin-holes, appear around the edge of the whole rounded shape that is mainly used for the connection with the fabric and sensor through a conductive thread.
- Out of these 22 pinholes, one is reserved for +5V, and one for ground.

- The LilyPad Arduino incorporates 6 analog inputs that can also be used as digital I/O. They are marked as A0 through A5 on the board, providing 10 bits of resolution. It is important to note that, the analog inputs measure from ground to 5 volts, however, the upper end of their range can be modified using the analogReference() function.
- The board contains 14 digital pins that can be employed as an input or output, using pinMode(), digitalWrite(), and digitalRead() functions.
- Like other boards in the Arduino, this Pad is programmed by Arduino IDE - an official software mainly used for programming the Arduino Boards, that is developed by Arduino.cc
- The board comes with a wide voltage range and operates anywhere between 2.7 V to 5.5 V. The pins on the board come with the ability to control and handle the input or output of the attached device.
- There are two ways to keep your Pad null and void: increase the operating voltage above 5.5 V or plug the power in reverse order.
- As I mentioned earlier bootloader is used for storing the code and burning it on the board, however, you can also bypass the bootloader and program the ATmega328 using ICSP (In-Circuit Serial Programming) header.
Features
Following are the main features of the Arduino LilyPad.
| Microcontroller | ATmega168 or ATmega328V |
| Digital I/O Pins | 14 |
| Analog Input Channels | 6 |
| PWM Channels | 6 |
| Crystal Oscillator | 8 MHz |
| Flash Memory | 16 KB (of which 2 KB used by bootloader) |
| Bootloader Memory | Out of 16KB in the Flash Memory, 2KB is reserved for Bootloader |
| SRAM1 KB | 1 KB |
| EEPROM | 512 bytes |
| Operating Voltage | 2 to 5 V |
| DC Current per I/O Pin | 40 mA |
| Internal pull-up resistor | 20 kO |
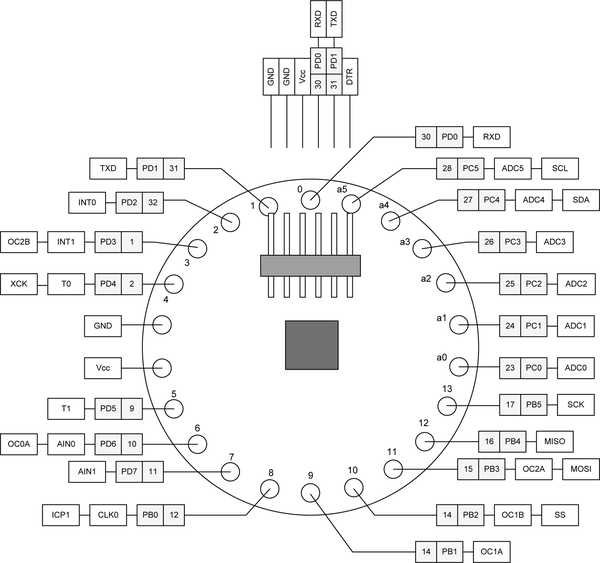
Arduino LilyPad Pinout
- Arduino Lilypad Pinout is shown in the below figure:
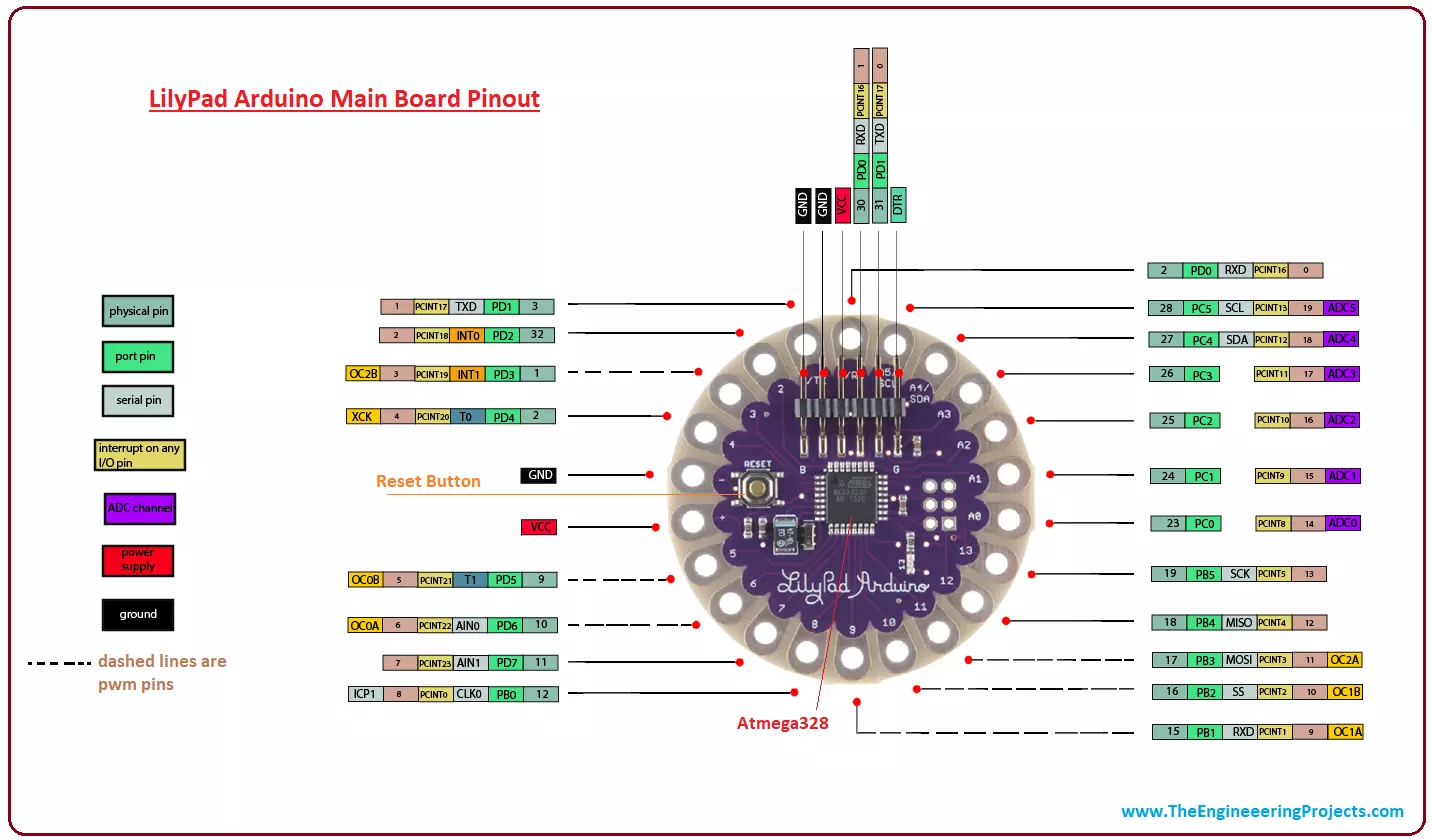
- There is a candid difference between external interrupt pins and PCINT pins. Former is the dedicated hardware pin used for generating the interrupt while later is the interrupt that can be created on any digital I/O pin.
- There are 6 PWM tabs on the board, shown by the dashed lines on the pinout image above. These PWM pins can also be used as digital I/O pins.
Circuit:
In this tutorial, we will show how to upload the source code from Arduino software or IDE to Lilypad Arduino. We need to prepare the following materials before proceeding to next step:
- Female to female jumper wire
- USB mini B cable
- USB to UART FTDI Converter
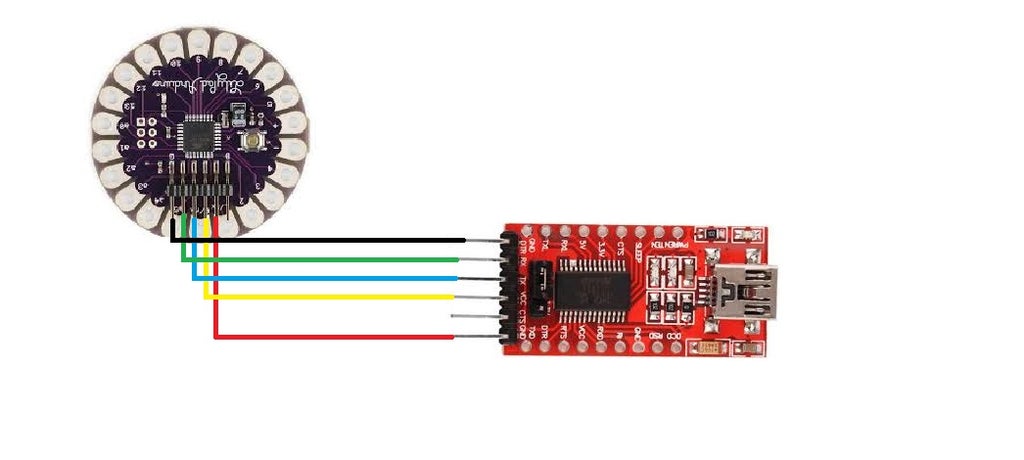
The first diagram shows Lilypad Arduino pin diagram that labeled the pins respectively. The second and third diagram showed the connection between Lilypad Arduino and FTDI Converter. Referring to first diagram for the pin of Lilypad Arduino, the connection is listed as below:
- GND > GND
- Vcc > Vcc
- RXD > TX
- TXD > RX
- DTR > DTR
After completing the connection, connect FTDI Converter with power supply with a USB cable.
Insert Source Code


In this tutorial, we use example in Arduino software to observe the function of Lilypad Arduino.
- On the top-left bar, click [Files] > [Examples] > [01.Basics] > [Blink] to use the example in Arduino software.
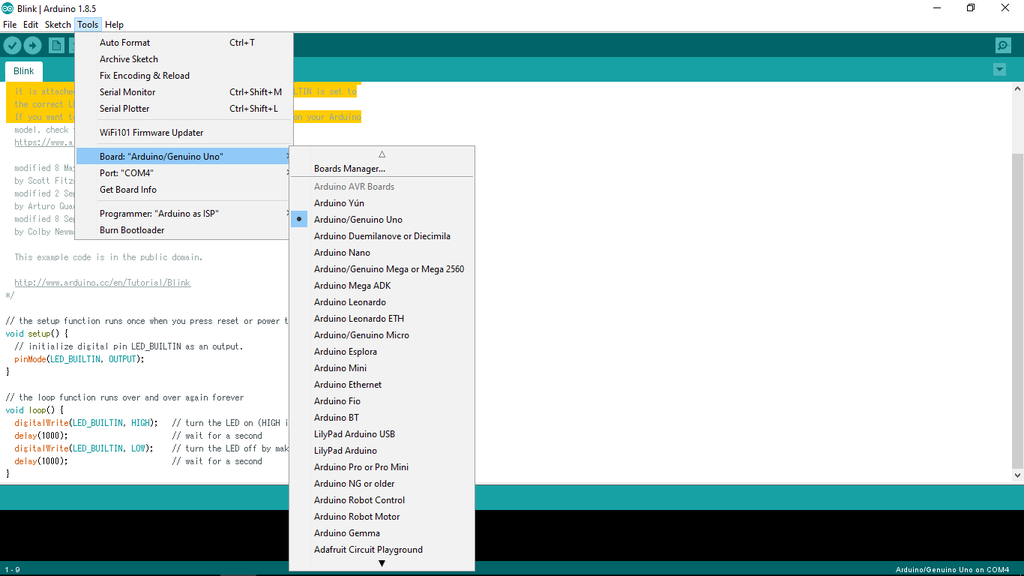
- Next, we need to set up the type of board so that Arduino is able to read Lilypad Arduino. Click [Tools] > [Board: "XXXXX"] > [Arduino/Genuino Uno].
- Why do we select [Arduino/Genuino Uno] instead of [Lilypad Arduino]? Because in this tutorial we used Lilypad Arduino that made in China, which it has been burned by bootloader as Arduino Uno, so it is functioned as Arduino Uno.
- After that, we need to set up the port. In the diagram above, we used COM4 as port. To obtain the driver of FTDI Converter for the port, please refer to the website: http://www.ftdichip.com/FTDrivers.htm.
- Upload the source code into Lilypad Arduino and observe the results.
Results
According to the [Blink] source code,
- Arduino will experience high voltage level which turn on LED.
- After a second, the voltage level will be lower down and thus turn off LED.
- After another 1 second, the LED will be turned on due to high voltage level.
- The steps will be repeated until there is no power supply to arduino.
In this tutorial, we uploaded the [Blink] source code and observe the outcome. The LED on Lilypad Arduino is blinking with time interval of 1 second. Now we can conclude that the source code is uploaded successfully and Lilypad Arduino is working properly!