

Description
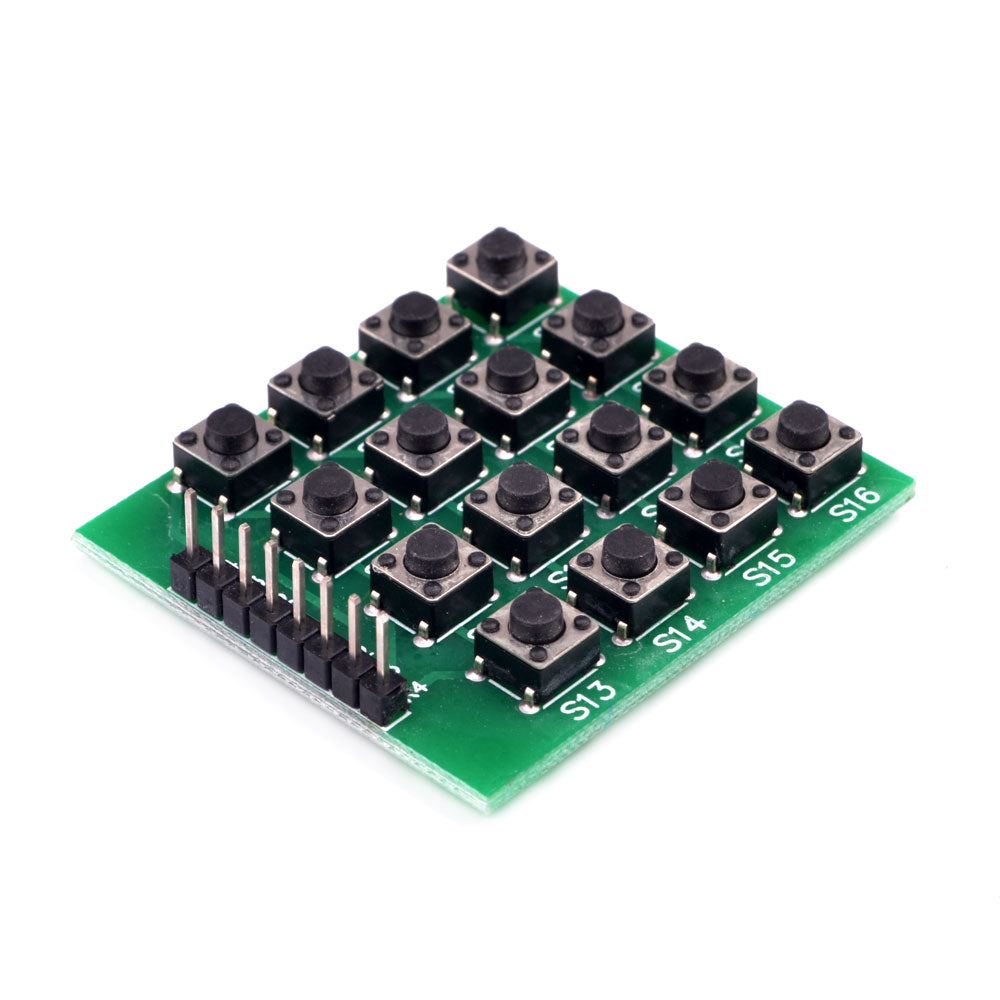
The Keypad 4x4 Matrix 16 Button Keyboard Module is a simple and cost-effective input device that allows users to input data through a 4x4 matrix keypad. This module can be easily interfaced with an Arduino board or any other microcontroller unit through an 8-pin header, which is located on the upper part of the board. This module features 16 tactile push buttons arranged in a 4x4 matrix, allowing for a total of 16 different button combinations. The pin header pitch of the module is 2.54, which is a standard pitch used for prototyping and breadboard applications. The keypad module has a maximum insulation resistance of 100MΩ at 100V and a maximum I/U rating of 100mA and 35V. The contact bouncing time is around 5ms, which is a standard value for most tactile switches. The module is rated for the durability of up to 1 million presses, making it suitable for a wide range of applications. With its compact size of 43mm x 39mm, this module is easy to integrate into a wide range of projects, including security systems, access control, home automation, and industrial control systems. It is a popular input device due to its ease of use, low cost, and versatility.
Features
-
Matrix Keypad: The module has a universal 4x4 matrix keypad with 16 buttons.
- Easy to Use: The module features a header on the upper part of the board that allows you to quickly and easily hook up the Keypad to an Arduino Board or any other MCU.
- Pin Header Pitch: The module has a standard pin header pitch of 2.54mm.
- Connector: The module comes with an 8-pin connector for easy wiring.
- Insulation: The insulation resistance of the module is 100MΩ 100V.
- Maximum I/U: The module can handle a maximum current of 100mA and a maximum voltage of 35V.
- Contact Bouncing: The contact bouncing time of the module is 5ms.
- Durability: The module has long durability and can withstand up to 1 million presses.
- Compact Size: The module has a compact size of 43mm x 39mm, making it suitable for various applications.
Package Includes:
- 1 x Keypad 4x4 Matrix 16 Button Keyboard Module
Pinout of the Module:
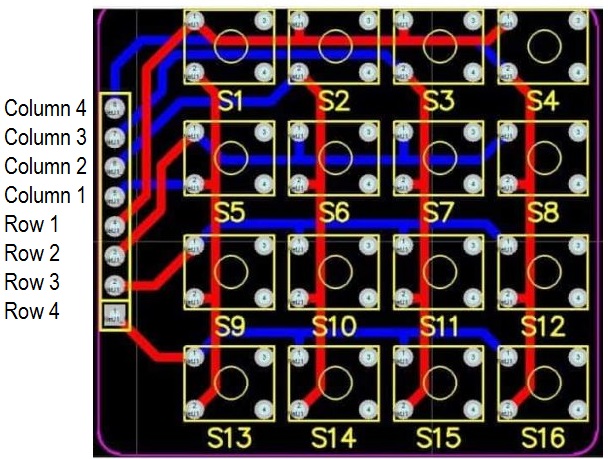
Circuit:
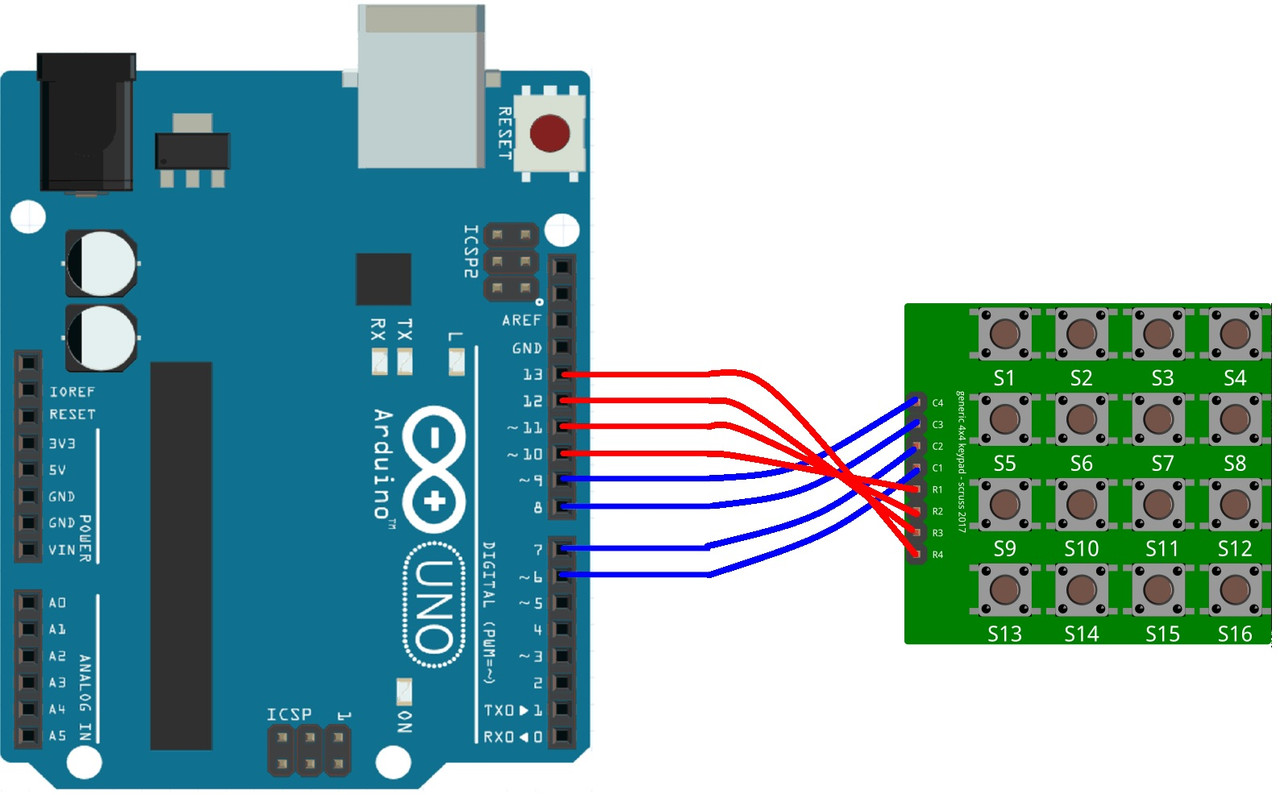
- Keypad row 1 pin is connected to Arduino digital pin 10
- Keypad row 2 pin is connected to Arduino digital pin 11
- Keypad row 3 pin is connected to Arduino digital pin 12
- Keypad row 4 pin is connected to Arduino digital pin 13
- Keypad column 1 pin is connected to Arduino digital pin 6
- Keypad column 2 pin is connected to Arduino digital pin 7
- Keypad column 3 pin is connected to Arduino digital pin 8
- Keypad column 4 pin is connected to Arduino digital pin 9
Library:
To install the Keypad library for Arduino, follow these steps:
- Open the Arduino IDE software on your computer.
- Select "Sketch" from the menu, then "Include Library", and then "Manage Libraries...".
- In the Library Manager, search for "Keypad" and select the Keypad library from the search results.
- Click on the "Install" button to install the Keypad library.
- Wait for the installation process to complete.
- Once installed, you can include the Keypad library in your Arduino code by selecting "Sketch" from the menu, then "Include Library", and then selecting "Keypad" from the list of installed libraries.
Note: Make sure that you have an internet connection during the installation process. The installation process may take some time depending on the speed of your internet connection.
Code:
This example code initializes a 4x4 keypad with symbols on the buttons defined as '0' to '9' and 'A' to 'F'. The code then waits for a key press and when a key is pressed, it prints the corresponding value to the serial monitor at a baud rate of 9600.
#include "Keypad.h"

const byte ROWS = 4; /* four rows */
const byte COLS = 4; /* four columns */
/* define the symbols on the buttons of the keypads */
char hexaKeys[ROWS][COLS] = {
  {'0','1','2','3'},
  {'4','5','6','7'},
  {'8','9','A','B'},
  {'C','D','E','F'}
};
byte rowPins[ROWS] = {10, 11, 12, 13}; /* connect to the row pinouts of the keypad */
byte colPins[COLS] = {6, 7, 8, 9}; /* connect to the column pinouts of the keypad */

/* initialize an instance of class Keypad */
Keypad customKeypad = Keypad(makeKeymap(hexaKeys), rowPins, colPins, ROWS, COLS);

void setup(){
  Serial.begin(9600);
}

void loop(){
  // check for key press
  char customKey = customKeypad.getKey();

  // if a key is pressed, print the key value to the serial monitor
  if (customKey != NO_KEY){
    Serial.println(customKey);
  }
}-
First, the Keypad library is included, and constants for the number of rows and columns on the keypad are defined. Then a 2D array of characters is defined, which represents the symbols on the buttons of the keypad.
-
Next, two arrays of bytes are defined to represent the row and column pins of the keypad, respectively. These arrays are used to initialize a Keypad object called
customKeypad, which represents the physical keypad connected to the Arduino. -
In the
setup()function, the code initializes serial communication with a baud rate of 9600, which allows us to print values to the serial monitor in the Arduino IDE. -
In the
loop()function, the code checks if any key on the keypad has been pressed by calling thegetKey()method of thecustomKeypadobject. If a key has been pressed, its value is stored in thecustomKeyvariable. IfcustomKeyis not equal toNO_KEY(a constant defined in the Keypad library to represent no key being pressed), the value ofcustomKeyis printed to the serial monitor using theprintln()function.